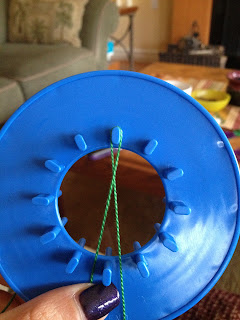
I felt that this assembly and disassembly was extremely inefficient, so I set out to look for a loom that was meant to make these flowers. It wasn't that difficult to find one. I went to Michaels, and they had a couple versions. I settled on the loom from The Crochet Dude. It cost about $4.00 and I had a 50% off coupon. I bought a couple bundles of embroidery thread in our wedding colours, and off I went.
The loom has 2 notches at the bottom. First, start with a tail of about 15", and then put the thread into the notch. You then start by looping the thread around the peg directly opposite the notch. I like to do it in a figure 8.
Next, you figure 8 the thread around the peg directly opposite the first peg. You can now either loop the thread around the first peg again, or you can move left, and continue until all the pegs are looped. I prefer looping each peg twice before moving on. Depending on how full you want the flower to look, you can go around either 2 or 3 times. To conserve thread, I think 2 loops look pretty good.
Once all the pegs are looped to your liking, you can put that end into the second notch, and then cut the thread with about 2 inches left. This is only so you can hold that end taut while you are backstitching the middle of the flower.
I like to spin the loom around so that the notches are at the top. Thread the 15" end through the needle, and count back 2 petals, go down, and come back up 3 petals later. So back 2, forward 3.
Continue back stitching until all the petals have been stitched. I like to go around the center twice, or until I have about 2 inches of thread left.
Once the center has been stitched, you can finish it off by weaving the end in and out of the petals to secure, or you can tie the 2 ends together.
Here is the finished flower:
Once I got the hang of it, it took me about 10 minutes per flower. It's a great project to do when you're watching TV, when you don't really have to focus on what you're doing. for a small flower like the one I've shown, about 2" in diameter, it used about 2 meters of thread when going around 2 times.
Let me know what you think!
xoxo
Meesh


No comments :
Post a Comment