Showing posts with label pinterest. Show all posts

7.25.2013

Frozen Banana Ice Cream

We've been waging the war against fruit flies, and our bananas are always first to fall victim to this war. So we've been freezing a lot of bananas. While I love a good smoothie, and banana bread, I wanted to find something new. Off to Pinterest I go. I've always wanted to make my own ice cream, but I don't want to invest in an ice cream maker. So I was ecstatic when I found this pin.

All you really need are bananas, and any other flavouring you want to add to it. I didn't think bananas would give me the creamy texture like ice cream, but I was pleasantly surprised!


Ingredients

3 - 4 frozen bananas


Optional Ingredients
2 tablespoons Nutella
1/4 chocolate chips


Instructions

  1. Break bananas into smaller pieces
  2. Whiz it up in the food processor - about 30 seconds
  3. Add flavourings (optional)
  4. Transfer into a freezer safe container, and freeze for about one hour to firm up the mixture.
  5. EAT!


What would you flavour your banana ice cream with?

xoxo
~meesh

6.25.2013

Nutella Bites: Tried and tested Pinterest recipe


I bought Nutella from Costco. This means I have A LOT of Nutella. When I need a recipe, my go-to resource these days is Pinterest (follow me!). I decided to go with this pin because I already have all the ingredients, except the powdered sugar.

The directions are so simple, I had to make it right away, even though it was 9:30pm. All you have to do is whisk all the ingredients together, spoon 2 tablespoons of the batter into a muffin tin, bake for 20 - 23 minutes at 350 degrees until a toothpick poked into the center comes out clean.


For the full recipe, head over to Vancity Buzz!

How do you eat Nutella?

xoxo
~meesh

6.20.2013

What do you need to know before hiring a wedding planner?

When I was younger, I was convinced I'd spend $10,000 on a dress, and of course I'd hire a wedding planner. Fast forward 15 years, reality sets in. My dress costs less than $2000, and I don't have a wedding planner.


I still wanted to hire a planner when I first started planning my wedding. I don't have one creative gene in me, but I am particular about what I DON'T like. My problem is that I don't know what I do like!

I started asking for wedding planning quotes over a year in advance. Getting married in a small town has its perks, but it also means there are limited number of vendors per industry. Wedding planning was one of these limited industries. The best, and really, only wedding planner was already booked on my date. So I asked for quotes from planners in Vancouver, gritting my teeth about paying for their travel costs the whole time.

In the end, I opted for a day-of coordinator instead of a full wedding planner. A day-of coordinator is a fraction of the cost of a full planner. She will confirm your vendors, choreograph the rehearsal, handle any last minute emergencies, and basically anything you need on your big day.

A lot of brides try to save a few bucks by having friends or family be the day-of coordinator. However, for us, we want our guests, and family to enjoy our big day. After all, we're spending all this money for a great celebration. The last thing we want is for our guest or family to worry about is if we would like the way they set our table.

By hiring a professional, you can dictate exactly what you want. If you don't like the way something is, all you have to do is ask it to be changed, without having to worry about hurting the other person's feelings.

Here are some things to think about when considering hiring a wedding planner or day-of coordinator:
  1. Does your budget allow it?
  2. What do you need the planner to do? Many planners offer partial packages where they takeover where you left off. You could also customize packages where the planner only deals with specific aspects of your wedding, such as, caterers, rentals, or decor.
  3. Meet with several planners to get a sense of what they can do for you. Do you have a "good" feeling about the company? Go with your gut!
  4. How busy are you leading up to the wedding? If you are working 80 hours a week, plus other responsibilities, chances are, you won't have time to actually plan your wedding.
  5. How big is your wedding? If your wedding is small, you can probably handle everything yourself. It's a different story if you have 200 guests.
  6. What is the minimum you'd be happy with? This is a strange question. But does your budget fit with your vision? Are you happy with a lesser quality to fulfill the quantity?
  7. At least hire a day-of coordinator!!! If you take anything away from this post, this is it. Don't ask your family or friends to coordinate for you. It might get tense on the day when something they do doesn't match the vision in your head. Save the stress, spend the money. Just hire the day-of coordinator!!
What are some of your wedding planning tips?

xoxo
~meesh

6.12.2013

Lemon Blueberry Loaf!

It's been a while since I've posted about my epicurean adventures here. That's because I've been contributing to Vancity Buzz. A local lifestyle blog about all things Vancouver.

I baked this Lemon Blueberry Loaf recently as part of my series "Pinterest Recipe Wins". I love this recipe because of the intense lemon flavour. If you're not a lemon fiend like I am, you can still make this recipe without the lemon extract.

For the recipe, head over to Vancity Buzz! I'll post some of my other Pinterest (follow me!) recipe experiments soon!


What's your favourite lemon recipe?

~Meesh

6.03.2013

DIY Wedding Signs

I've been collecting DIY ideas on Pinterest for over a year now. It's finally come time to execute some of these ideas. First up - directional signs! I got my inspiration from signs similar to this one on Pinterest:
Source
My mom is a very crafty person. She makes jewelry, dolls, pictures out of pressed flowers. I, however, am not crafty whatsoever. I collect ideas and ask her to make them for me. Unfortunately, she's been out of town, so I've been left to my own devices. Luckily Chris' sister is artistic, so I got some help from her.

We started off by getting some wood from Michael's. They were about 2' x 5". The original plan was to paint the writing on the wood. But we were at the Penticton Farmer's Market and saw a vendor selling signs with etched writing. We decided to do the same. Off we went to Wal-Mart, and we got some wood stain, and a wood burner. Chris' dad trimmed the wood pieces for us so they are like arrows. Chris' sister wrote on the signs with a pencil (I have terrible writing), and I got to work burning the wood.

Here is the finished product! The top sign only has one coat of stain, the others have 2 coats.


I took my time so I got the depth and width I wanted for each letter, but it was definitely worth it!. The wood was about $2.00 each, the burner was $15, and the stain was $7. We still have lots of stain left for other projects. If you're interested in the signs, shoot me an email! We would love to start a business doing this!

What are some of your DIY projects for your wedding?

xoxo
~meesh

11.19.2012

Twine Flowers - Wedding Decor!

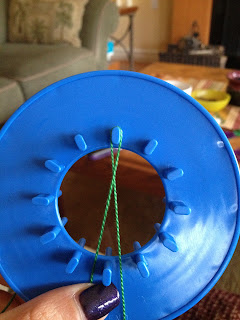
I made a list of DIY project that I want to do for our wedding. One of these things were twine flowers that I had found on Pinterest (Follow Me!). They were cute, rustic, and looked relatively simple to make. There was one thing that held me back was that you needed to make your own loom, and after each flower, you had to disassemble the loom and then reassemble it for the next flower.

I felt that this assembly and disassembly was extremely inefficient, so I set out to look for a loom that was meant to make these flowers. It wasn't that difficult to find one. I went to Michaels, and they had a couple versions. I settled on the loom from The Crochet Dude. It cost about $4.00 and I had a 50% off coupon. I bought a couple bundles of embroidery thread in our wedding colours, and off I went.


The loom has 2 notches at the bottom. First, start with a tail of about 15", and then put the thread into the notch. You then start by looping the thread around the peg directly opposite the notch. I like to do it in a figure 8.


Next, you figure 8 the thread around the peg directly opposite the first peg. You can now either loop the thread around the first peg again, or you can move left, and continue until all the pegs are looped. I prefer looping each peg twice before moving on. Depending on how full you want the flower to look, you can go around either 2 or 3 times. To conserve thread, I think 2 loops look pretty good.


Once all the pegs are looped to your liking, you can put that end into the second notch, and then cut the thread with about 2 inches left. This is only so you can hold that end taut while you are backstitching the middle of the flower.

I like to spin the loom around so that the notches are at the top. Thread the 15" end through the needle, and count back 2 petals, go down, and come back up 3 petals later. So back 2, forward 3.

 Continue back stitching until all the petals have been stitched. I like to go around the center twice, or until I have about 2 inches of thread left.
Once the center has been stitched, you can finish it off by weaving the end in and out of the petals to secure, or you can tie the 2 ends together.

Here is the finished flower:
To make a double flower, you simply create the second flower on top of the first, and stitch them both together at the same time. The same concept of 2 back, 3 forward applies when you're backstitching. you would only need one tail end to stitch the flowers together. You can choose to use the end from either flower. Just make sure you leave enough thread to stitch it all together.

Once I got the hang of it, it took me about 10  minutes per flower. It's a great project to do when you're watching TV, when you don't really have to focus on what you're doing. for a small flower like the one I've shown, about 2" in diameter, it used about 2 meters of thread when going around 2 times.

Let me know what you think!

xoxo
Meesh

11.06.2012

Invitations Decisions!!


Those close to me know I have major issues when it comes to decision making. I blame it on being a Libra. So the latest dilemma is how to do our invitations. I've been perusing Pinterest (FOLLOW ME!) for months now, and the more I look, the less I seem to be able to decide.

I originally wanted something formal, with a pocket, and staggered inserts (see original post here). But as the details of our wedding are being finalized, well, as finalized as someone with decision making issues can be, my vision for our invitations have evolved. I don't want something super formal, since our wedding will not be super formal. I've been deciding between fun vs. classic. Here are some of the concepts I've toyed with:

FUN:
nickeldesign on Etsy

100 Layer Cake - Cheerful Maine Wedding: Ruth + Ed
Lauren by The Pulp Studio
Classic:
Pinkpolka Wedding Invitation
Hydrangea Invitation by redpearldesigns on Etsy
It was and is difficult deciding what we're going to do. My MOH was so sick of hearing me flip flop between all the various options that she just flipped a coin and decided for me. I was happy with the decision, but in the end, I went back to basics. I thought about what my original inspiration for the wedding was. What inspired me to choose green as my supplementary colour?

This picture was what started it all. 
Chic & Modern Wedding in Calgary - Wedding Obsession
I decided to look for examples with baby's breath as the inspiration. After looking through maaaany maaaany images, I decided to do something similar to this invitation.


A Down Home BBQ Wedding - Ruffled Blog
In addition to baby's breath, my bridesmaid Jocelyn suggested we add some lavender to the graphic since we will be giving honey infused with our home-grown lavender as wedding favors. And of course, purple is one of our colours.

We will print the invitation on vellum, and back it on a piece of linen textured purple card. There will be one piece for the actual invitation, and one for the map. We are going to use our app as our  RSVP tool, so it's still up in the air as to whether we will have a RSVP card directing guests to our app.

That's my decision for this week anyway. I may change my mind in a few weeks, and rethink all of this. LOL

xoxo
~meesh

7.22.2012

Engagement Party!

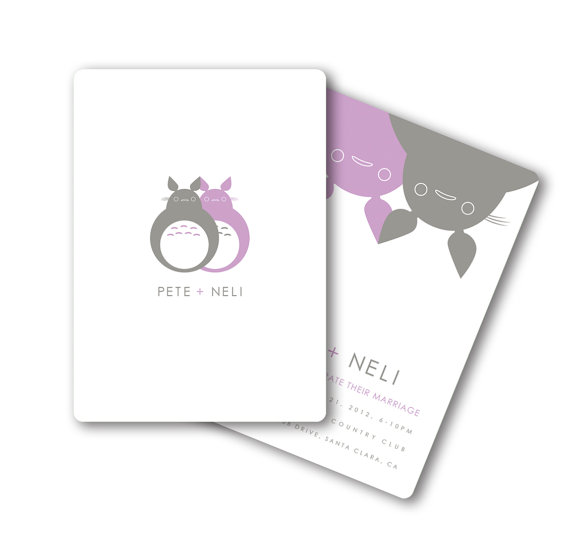
We had our engagement party about a month ago. We kept it small, only close friends and immediate family. We wanted to keep the cost low, so I opted to make the invites myself. My inspiration is from Pinterest/Etsy. Here is the finished product:

I created the text on Photoshop, and had them printed at Kinko's. The total cost for printing 30 invites was about $9.00. The envelopes actually cost me more at $15.00!! If you plan on making your own invites, definitely invest in a corner punch. I think the rounded corners definitely make them look more professional.

We had our engagement party in our backyard to keep the cost down, and to keep it low key. We bought paper lanterns from China's version of eBay, TaoBao. The total for 30 lanterns, came to about $5.00CDN. They're the same colour as our colours for the wedding, green and purple.

Here is a picture of the lanterns strung up. We had them strung up around 3 sides of our backyard.


We bought most of our food from Costco. Here is our charcuterie plate. We also had some cheese, various salads, steak and chicken wings.
Our most expensive item, was definitely our cake. It was well worth it!! It was delicious!! Chris and I have a thing with poo talk, I know, it's weird. The topper was made of fondant, and the cake was chocolate with hazelnut filling.

Here are the lanterns at the end of the night. We're definitely going to reuse these for our reception.
It was a great party. Our families got to know each other better, and we our friends got to know each other better too. It was simple, and most importantly, we all had fun!

I want to thank everyone who helped with the party. Particularly my mom, Vanessa, my maid of honour, and Jon. They made sure the party went smoothly and I was stress free! 

xoxo
~meesh

4.03.2012

Chickpea salad...AKA unblended hummus

When I was on vacation in Cuba with Cal and his family, the dishes we really enjoyed all had chickpeas. I didn't think much about it though, it was just really good and that was that. The only thing I ever made with chickpeas was hummus. My hummus is very delicious, if I say so myself! haha. I'll post the recipe next time I make it. But, what inspired this post, and the following recipe, was Pinterest (Follow ME!) of course. Hopefully, this will be the first of many things I try to make with chickpeas.

Here's the original inspiration:
(Source)
I followed this recipe pretty closely.

Cilantro Chickpea Salad

Inspired by Oh She Glows

1 can of chickpeas, rinsed and drained
2 cups of fresh spinach, chopped
1 cup of cilantro, chopped
1/4 cup of sweet onion, chopped
1 lime
1/2 teaspoon of cumin
dash of red chili flakes
2 teaspoons of Dijon mustard
1 teaspoon of extra virgin olive oil
1 garlic clove, minced
salt and pepper to taste

Whisk lime, mustard, olive oil, cumin, chili flakes, and garlic together until it comes together.
Toss with chickpeas, spinach, cilantro and onion.

I don't have a food processor, so I chopped everything by hand. If you have a processor, by all means, chop the spinach, onion, and cilantro with that.

Here's how it turned out:


Let me know if you like it!

xoxo
~Meesh

3.31.2012

Pinterest Strikes Again!!...Peanut Butter Banana Drop Cookies

When I went to the grocery store a few days ago, I had a few things I wanted to make. One of them was the Peanut Butter Banana Oatmeal Cookies:
(Source - via Pinterest)
I didn't make too many tweaks to this recipe, but as usual, I substituted what I had in the pantry instead of buying more product.

Peanut Butter Banana Drop Cookies

Inspired By lux hippie

3 ripe bananas
1 tablespoon vanilla extract (you could substitute any other extract you think might go well with bananas)
1/2 - 1 cup of peanut butter (I had natural smooth PB, use whatever is in your pantry)
2 1/2 tablespoons of blue agave syrup (could substitute honey, maple syrup, brown rice syrup etc...)
1/2 cup all-purpose flour
1 teaspoon baking powder
2 cups rolled oats
1/2 teaspoon salt
1/2 cup chocolate chips (I love dark chocolate, so I used dark chips. You could use white chocolate, semi-sweet, you get the idea)

Preheat oven to 350 degrees F.

Combine bananas, vanilla, peanut butter, and blue agave syrup. I bought mine from Home Sense, you can also buy it at health food stores, and also Costco!!

Once the banana mixture is a smooth consistency:
Add the dry ingredients. I didn't combine the dry ingredients in another bowl because I didn't want to wash another bowl. But you can if you wanted to, of course.

Once all the ingredients are combine, add in chocolate chips, and I also added 3 tablespoons of chia seeds since I had some in the house. 

The batter will be sticky, I recommend using two tablespoons to help you drop them on the cookie sheet instead of trying to wrangle the batter off with your fingers.
Bake for 15 minutes. I used a silpat mat (the best investment EVER!! You can also find these at Home Sense once in a while). If you don't have a silpat, use grease the cookie sheet, or use parchment paper. The cookies don't spread, so you can put them pretty close together.

Here's the finished product!
Let me know what you think!

xoxo
~meesh