Showing posts with label DIY. Show all posts

6.06.2014

Recipe: Cashew Milk

Since getting married, I've definitely let my diet go. I'm very sad to say, none of my dresses fit anymore. While I'm not on a path to get back to wedding skinny, I do want to feel better and have more energy. I did a three day DIY juice cleanse about a year ago, and I have been researching new recipes to try.

One juice cleanse drink I came across over and over again is cashew milk, specifically from Blueprint Cleanse. My version costs about $2.00 to make. The best part of using cashews is that you don't need to filter the milk like you do with almond milk. Just blend and drink.


Cashew Milk

Makes 4 cups

1 cup raw cashews
4 cups water (plus more for soaking)
1 tbsp vanilla extract
2 - 3 prunes
A pinch of cinnamon

Soak cashews for 2 - 3 hours. You can soak it for longer if you'd like.
Rinse soaked cashews under water until it runs clear.
Place drained cashews, and 4 cups of water, and the rest of the ingredients into the blender.
Depending on the type of blender you have, blend for 2 - 5 minutes until smooth.
DRINK!

I chose to use prunes as my sweetener. You can also use dates, figs, or syrups, such as agave and brown rice. You could also use different types of extracts, or use real spices.

What's your favourite nut milk?

xoxo
~meesh

8.03.2013

One week to go!

The big day is next Saturday! I can't believe how fast time flies! Our families are starting to arrive, and all the final details are falling into place.

Here are some of the things that will be a part of our special day!

Our "welcome" sign for the ceremony:


I went through a lot of pins before I finally decided on this program.


We also have fans for our guests during the ceremony.


I ordered a 5 pound bag of M&Ms in purple and green, but what arrived was 25 pounds, that's right, TWENTY-FIVE pounds of gold, cream, and pink M&Ms. I called M&Ms and it was easily rectified. My correct order was mailed and received within 5 days.


I also bought jelly beans and sour keys from Costco, and macarons from Gourmand Macaron for our dessert bar.

The aisle cones were initially inspired by this pin. I toyed with the idea of using burlap to make the cones, but after talking to experts at the fabric store, I decided it would be easiest to use paper. The instructions for the cones can be found here.


A few months ago, we made these signs for the reception.


Here are our wedding favours! They are 2 oz. jars of honey from a local beekeeper, Mellifera Bees. We got the jars from Michaels, and the honey is flavoured with cardamom and cloves. We had the stickers printed in China when we made our invitations.


We have over 100 twine flowers ready to go. I'm still not sure what they will be used for, but I trust that my day-of coordinator, and decorator will find some use for them.


I have pictures in their frames ready for the mantle at Hillside. We used some pictures from our childhood, and also a couple from our engagement shoot.


I ordered our burlap table runners from Debbie Jordan on Etsy. They are packed, and labeled.


I always knew that we need a hashtag for our wedding. We decided to go with #mcwedding13. I bought a chalkboard to display our hashtag, and while I was researching creative ways to write on the chalkbard, I came cross this amazing post! So of course I had to use the templates provided!


We have our wedding bands, marriage license, dresses, suits, shoes, accessories, and.....I don't even know!

There are so many other things going on in my head, that I can barely keep track. I just keep looking over my list of things to bring and hope that I won't forget anything.

We bought a lot of our smaller items, like the honey jars, fans, and paper for the aisle cones, from Michaels. That said, NEVER pay full price at Michaels. Download their app, and there are coupons every week. Also, keep an eye out for their flyers, there are always coupons there too. I was able to find most of our frames and chalkboard from HomeSense.

I taught myself Photoshop, InDesign and Illustrator so I can save some money on the programs. I designed the whole thing, saved it as a PDF, and sent it to a local printer to print. They came out to $1.50 each, with 10 pages.

How do you keep track of everything for your big day?

xoxo
~meesh

6.03.2013

DIY Wedding Signs

I've been collecting DIY ideas on Pinterest for over a year now. It's finally come time to execute some of these ideas. First up - directional signs! I got my inspiration from signs similar to this one on Pinterest:
Source
My mom is a very crafty person. She makes jewelry, dolls, pictures out of pressed flowers. I, however, am not crafty whatsoever. I collect ideas and ask her to make them for me. Unfortunately, she's been out of town, so I've been left to my own devices. Luckily Chris' sister is artistic, so I got some help from her.

We started off by getting some wood from Michael's. They were about 2' x 5". The original plan was to paint the writing on the wood. But we were at the Penticton Farmer's Market and saw a vendor selling signs with etched writing. We decided to do the same. Off we went to Wal-Mart, and we got some wood stain, and a wood burner. Chris' dad trimmed the wood pieces for us so they are like arrows. Chris' sister wrote on the signs with a pencil (I have terrible writing), and I got to work burning the wood.

Here is the finished product! The top sign only has one coat of stain, the others have 2 coats.


I took my time so I got the depth and width I wanted for each letter, but it was definitely worth it!. The wood was about $2.00 each, the burner was $15, and the stain was $7. We still have lots of stain left for other projects. If you're interested in the signs, shoot me an email! We would love to start a business doing this!

What are some of your DIY projects for your wedding?

xoxo
~meesh

5.30.2013

Invitations - Signed, Sealed and Delivered!

A question I often get asked is how much should we spend on invitations. This is really a personal questions and depends on your budget. My invitations came to about $1.20CDN each. I was also very lucky that my aunt is an amazing artist, and she drew everything on our invitations by hand, and her friend created the digital files for the printer. Our costs probably would have doubled if did not have my aunt and her friend's help.

My friend had her invitations made in Indonesia, and it cost her $0.12 each. That's not a typo. Twelve cents! My bridesmaid's wedding invitations are laser cut, with a photo as the backing, and will cost between $3.00 - $5.00 each.

So my advice: choose a style you love, and get as many quotes as you can. You will most likely find the cheapest prices in Asia. If you have the time, and are not afraid of the potential risks, such as shipping, communication, and quality, then definitely have them done in Asia. If you're doing a small batch, and don't want to take those risks, then do them locally. But always ask around, get as many quotes as you possibly can, and NEGOTIATE!

We received our unassembled invitations from China a little while ago. While looking at the parts of the invitations was VERY daunting, it actually wasn't as bad as I thought it would be when I was putting everything together. I also realized I am more anal-retentive than I thought I would be.

Our invitations had a backing card, vellum page (with the actual invitation details), map, RSVP, and also an invite to our rehearsal dinner. Since we are having a destination wedding, most of our guests are from out of town, so we thought we might as well invite everyone to our rehearsal dinner.

Step 1. Punch holes in the backing card and the vellum. Luckily the printer also printed marks for where the holes should be. That saved me a LOT of time. It's a good idea to get your printer to do the same for you.


Step. 2 Cut the ribbon to the length you want. I did a test ribbon, and just cut the rest to the same length. Tip: use SHARP scissors, and cut all the ribbon first, instead of one at a time for each invitation. I also decided to dovetail the ribbon. To do that, simply fold the end in half, and cut at an angle. I wasn't too particular about have the exact same angle for each ribbon. It probably would've taken me a lot more time if I was THAT anal.

Step 3. Tie backing card to the vellum with ribbon. This part was pretty quick once you get in the zone. Pay attention about which side of the ribbon is shiny, and also how the knot is tied. I tried to make them all as similar as possible.

Step 4. Tie all the different cards together with raffia. I wanted a more rustic look, so I tied everything together with raffia. I only got one roll of raffia from the craft store, so guests who didn't give me their address in time for the first batch of invites ended up not getting raffia with their package.

Step 5. Here they are, all in their little pearlized envelopes. I also had a rubber stamp made with our names and return address. But because of the type of paper the envelope was made of, the stamp just smudged. So sadly, we didn't use our stamp.

Step 6. Labels. I used clear printer labels. I have terrible hand-writing. So why waste time writing out names and address when I can just print them with a nice font? Efficiency is key!

I assembled about 60 invitations. It took me 5 hours, and I did it on my own. It obviously would have taken less time if I had help. But I wanted everything to look the same, so I opted to do everything on my own.

My question to you, how much did you/will you be spending on your wedding invitations?

xoxo
~meesh

1.15.2013

The Bridal Swap is back!! April 7th, 2013 - Roundhouse Community Centre

DreamGroup Productions' Bridal Swap is back! DreamGroup is more famously known for their Brock House Wedding Show. I went to the show this year, and must say, out of all the bridal shows I've been to, Brock House was the best!

Anyway, the Bridal Swap is for past brides to sell their gently used decor, such as, linens, vases, mirrors, anything you can think of, to future brides. This is a great opportunity to make some money (for past brides), and to save some money (for future brides).

There is also an opportunity to consign your wedding dress! Dresses are all less than $800! This is awesome for budget brides.

Small tables at the booth are $25.00, and large tables are $50.00.

There will also be a small group of professional vendors available to answer any questions you may have.

For more information, check out the website.
Be sure to like their Facebook page and follow them on Twitter!

11.19.2012

Twine Flowers - Wedding Decor!

I made a list of DIY project that I want to do for our wedding. One of these things were twine flowers that I had found on Pinterest (Follow Me!). They were cute, rustic, and looked relatively simple to make. There was one thing that held me back was that you needed to make your own loom, and after each flower, you had to disassemble the loom and then reassemble it for the next flower.

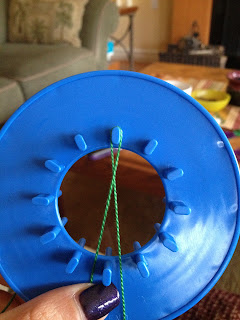
I felt that this assembly and disassembly was extremely inefficient, so I set out to look for a loom that was meant to make these flowers. It wasn't that difficult to find one. I went to Michaels, and they had a couple versions. I settled on the loom from The Crochet Dude. It cost about $4.00 and I had a 50% off coupon. I bought a couple bundles of embroidery thread in our wedding colours, and off I went.


The loom has 2 notches at the bottom. First, start with a tail of about 15", and then put the thread into the notch. You then start by looping the thread around the peg directly opposite the notch. I like to do it in a figure 8.


Next, you figure 8 the thread around the peg directly opposite the first peg. You can now either loop the thread around the first peg again, or you can move left, and continue until all the pegs are looped. I prefer looping each peg twice before moving on. Depending on how full you want the flower to look, you can go around either 2 or 3 times. To conserve thread, I think 2 loops look pretty good.


Once all the pegs are looped to your liking, you can put that end into the second notch, and then cut the thread with about 2 inches left. This is only so you can hold that end taut while you are backstitching the middle of the flower.

I like to spin the loom around so that the notches are at the top. Thread the 15" end through the needle, and count back 2 petals, go down, and come back up 3 petals later. So back 2, forward 3.

 Continue back stitching until all the petals have been stitched. I like to go around the center twice, or until I have about 2 inches of thread left.
Once the center has been stitched, you can finish it off by weaving the end in and out of the petals to secure, or you can tie the 2 ends together.

Here is the finished flower:
To make a double flower, you simply create the second flower on top of the first, and stitch them both together at the same time. The same concept of 2 back, 3 forward applies when you're backstitching. you would only need one tail end to stitch the flowers together. You can choose to use the end from either flower. Just make sure you leave enough thread to stitch it all together.

Once I got the hang of it, it took me about 10  minutes per flower. It's a great project to do when you're watching TV, when you don't really have to focus on what you're doing. for a small flower like the one I've shown, about 2" in diameter, it used about 2 meters of thread when going around 2 times.

Let me know what you think!

xoxo
Meesh

3.15.2012

Getting ahead of myself...as usual

So I had been mulling over the location for the whole for a few weeks now. Cal and I decided to host the wedding in Penticton, so I've been tasked with finding a venue for the reception. I thought that since Penticton is the Napa of British Columbia that it would be easy finding a venue for 100 people at a winery. Was I ever in for a surprise. Fact: there are a lot of wineries in Penticton and Naramata. BUT, there aren't many that have the space to host a reception. I even considered taking the reception out to the surround towns such as Oliver, Okanagan Falls, and even as far as Osoyoos. Hosting the reception in these towns brings its own set of challenges. Our ceremony will be a church wedding, and that is to be held in Penticton. So if we were to have the wedding elsewhere, we would need to provide a shuttle from Penticton to the reception. But this means that our guests will have to arrive and leave at a specified time, or we have to provide multiple bus times. Anyway, to distract myself from finding a venue, I started looking at invitations.

I'm definitely leaning towards DIY suites instead of getting ones custom made. This would save us a ton of money. In an ideal world, I would loooove to have something like this:
But at over $7.00 each, I think it's a way too much for us to spend on invitations. I've been playing around with the free DIY templates from Wedding Chicks and it's been pretty fun! I think right now my favourite so far is this style:
I can choose multiple colours, and obviously the customize all the wording. This suite also includes Save the Date, RSVP and the program. The only thing missing in this suite for me is the menu card. I don't plan on having one menu for each guest, since that seems like a waste, so probably just 1 or 2 menus per table depending on the size and shape of our tables.

There are so many options for online DIY invitations. It's definitely going to be a challenge to find a template with the design we like, and also the right price. Hopefully Wedding Chicks will come out with one that's a winery theme! (hint hint).

I've also considered using seed paper instead of traditional card stock. Seed paper is paper that is embedded with seeds. They paper is supposed to sprout when you plant it. I like this idea because it's eco-friendly, but also because Cal loves gardening. Those close to us will understand the personal thought that went into the paper. I found Botanical Paperworks through some googling, and discovered that they do custom invitations, or you can buy DIY kits and print them yourself!


Botanical Paperworks also provides a free template if you want to print them yourself. You don't need a special printer or ink for the paper, so if you have a small wedding, you can totally print them off you ink-jet printer at home.

If we decide to go with seed paper, the company also has place cards, favours, menu cards...the options seem endless. I love these a favours:
They're $138 for 100 pieces, which is completely reasonable. However, with many of our guests coming from abroad, I'm not sure if it's worthwhile since they will not be able to bring it home with them.

So much to think about!!!

xoxo
-Meesh